Online Technical Training Blog
How to Safely Remove Your USB
So, you have successfully registered for one of our online technical programs, have requested your Interactive Learning Package and now have your program material. If you chose the USB format, you will find the following information helpful.
Before removing your USB from your computer, please remember to always remove it properly. If you remove the USB without using safe removal, your USB may become corrupted, which means that for all intents and purposes, it is ruined and unusable.
Here are five easy steps to safely remove your USB:
1. Remove Hardware Icon
Search for the Remove Hardware icon, this is located in the Windows taskbar, usually at the bottom right corner next to the clock.

If you do not see it, then please go to Computer, find the USB icon, then right click on the USB icon, click on eject.


2. Systems Tray
The systems Tray will appear, please right-click on the “Safely Remove Hardware and Eject Media” icon.

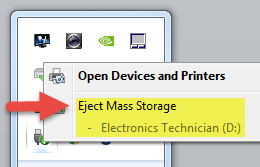
3. Eject Mass Storage Message
When you see the “Eject Mass Storage” message, please left-click on the device you wish to “eject”.

4. Safe to Remove Hardware Message
When your see the “Safe to Remove Hardware” message, please remove the USB from the port.

If you have any other questions about How to Safely Remove Your USB, please give us a call, toll free at 1-866-279-1457 (within the US and Canada) or contact us by email at [email protected].